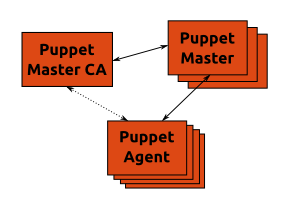
Overview of a Puppet Split CA architecture

October 6, 2010


The Puppet Master CA is the only Certificate Authority (CA) in the whole infrastructure. It issues certificates for all Puppet agents. It also manages the Puppet Master systems.

The Puppet Masters are only responsible for compiling catalogs requested by Puppet Agents – they don’t act as CA themselves. They only accept Puppet Agents which certificates have been issued by the Puppet Master CA.

The Puppet Agent retrieves their certificates from the Puppet Master CA the first time they run. They connect to the Puppet Masters afterwards to get their catalogs. They won’t contact the Puppet Master CA anymore.

Puppet Master CA

The Puppet Master CA manages all Puppet Masters. In particular it distributes its own Certificate Revocation List (CRL) file to every Puppet Master. The Puppet Master CA also issues certificates to Puppet Agents.

Puppet Master

A Puppet Master runs under Apache and Passenger. Apache ssl module is configured to require certificates signed by the Puppet Master CA (/etc/apache2/site-available/puppetmaster):

 # Require certificates to be valid
 SSLVerifyClient require
 SSLVerifyDepth  1

The Puppet Master is also configured to not act as a Puppet CA (/etc/puppet/puppet.conf):

 [main]
 ca = false

Puppet Agent

Puppet Agents retrieve their certificate from the Puppet Master CA and request their catalog from one of the Puppet Masters (/etc/puppet/puppet.conf):

 [agent]
 ca_server = PUPPET_MASTER_CA
 server = PUPPET_MASTER

Conclusion

From a security perspective setting the SSLVerifyClient option to require increases the protection of Puppet Masters from unknown requests and revoked Puppet Agents. Having the Puppet Master CA manage the Puppet Masters also facilitates the distribution of the Puppet Master CA CRL.

On the reliability front new systems won’t be added to the infrastructure if the Puppet Master CA is unavailable. However existing Puppet Agents are still functional as long as they can connect to a Puppet Master.


Deploying a Hadoop cluster on EC2/UEC with Puppet and Ubuntu Maverick

September 27, 2010


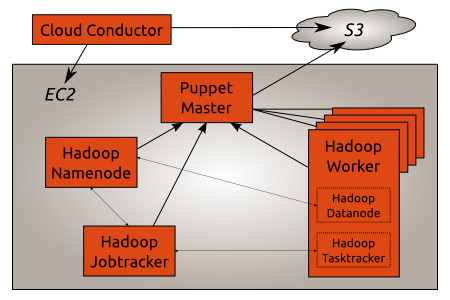
A Hadoop Cluster running on EC2/UEC deployed by puppet on Ubuntu Maverick.

How it works

The Cloud Conductor is located outside the AWS infrastructure as it needs AWS credentials to start new instances. The Puppet Master runs in EC2 and uses S3 to check which clients it should accept.

The Hadoop Namenode, Jobtracker and Worker are also running in EC2. The Puppet Master automatically configures them so that each Worker can connect to the Namenode and Jobtracker.

The Puppet Master uses Stored Configuration to distribute configuration between all the Hadoop components. For example the Namenode IP address is automatically pushed to the Jobtracker and the Worker nodes so that they can connect to the Namenode.

Ubuntu Maverick is used since Puppet 2.6 is required. The excellent Cloudera CDH3 Beta2 packages provide the base Hadoop foundation.

Puppet recipes and the Cloud Conductor scripts are available in a bzr branch on Launchpad.

Setup the Cloud Conductor

The first part of the Cloud Conductor is the start_instance.py script. It takes care of starting new instances in EC2 and registering them in S3. Its configuration lives in start_instance.yaml. Both files are located in the conductor directory of the bzr branch.

The following options are available on the cloud conductor:

  • s3_bucket_name: Sets the name of the S3 bucket used to store the list of instances started by the Cloud Conductor. The Puppet Master uses the same bucket to check which Puppet Client should be accepted.
  • ami_id: Sets the id of the AMI the Cloud Conductor will use to start new instances.
  • cloud_init: Sets specific cloud-init parameters. All of the puppet client configuration is defined here.Public ssh keys (for example from Launchpad) can be configured using the ssh_import_id option. The cloud-init documentation has more information [1] about what can be configured when starting new instances.

A sample start_instance.yaml file looks like this:

# Name of the S3 bucket to use to store the certname of started instances
s3_bucket_name: mathiaz-hadoop-cluster
# Base AMI id to use to start all instances
ami_id: ami-c210e5ab
# Extra information passed to cloud-init when starting new instances
# see cloud-init documentation for available options.
cloud_init: &site-cloud-init
ssh_import_id: mathiaz

Once the Cloud Conductor is configured a Puppet Master can be started:

./start_instance.py puppetmaster

Setup the Puppet Master

Once the instance has started and its ssh fingerprints can be verified the puppet recipes are deployed on the Puppet Master:

bzr branch lp:~mathiaz/+junk/hadoop-cluster-puppet-conf ~/puppet/
sudo mv /etc/puppet/ /etc/old.puppet
sudo mv ~/puppet/ /etc/

The S3 bucket name is set in the Puppet Master configuration /etc/puppet/manifests/puppetmaster.pp:

node default {
class {
"puppet::ca":
node_bucket => "https://mathiaz-hadoop-cluster.s3.amazonaws.com";
}
}

And finally the Puppet Master installation can be completed by puppet itself:

sudo puppet apply /etc/puppet/manifests/puppetmaster.pp

A Puppet Master is now running into EC2 with all the recipes required to deploy the different components of a Hadoop Cluster.

Update the Cloud Conductor configuration

Since the Cloud Conductor starts instances that will connect to the Puppet Master it needs to know some information about the Puppet Master:

  • the Puppet Master internal IP address or DNS name. For example the DNS name of the instance (which is the FQDN) can be used.
  • the Puppet Master certificate (located in /var/lib/puppet/ssl/ca/ca_crt.pem):

On the Cloud Conductor the information gathered on the Puppet Master is added to start_instance.yaml:

agent:
# Puppet server hostname or IP
# In EC2 the Private DNS of the instance should be used
server: domU-12-31-38-00-35-98.compute-1.internal
# NB: the certname will automatically be added by start_instance.py
# when a new instance is started.
# Puppetmaster ca certificate
# located in /var/lib/puppet/ssl/ca/ca_crt.pem on the puppetmaster system
ca_cert: |
-----BEGIN CERTIFICATE-----
MIICFzCCAYCgAwIBAgIBATANBgkqhkiG9w0BAQUFADAUMRIwEAYDVQQDDAlQdXBw
[ ... ]
k0r/nTX6Tmr8TTU=
-----END CERTIFICATE-----

Start the Hadoop Namenode

Once the Puppet Master and Cloud Conductor are configured the Hadoop Cluster can be deployed. First in line is the Hadoop Namenode:

./start_instance.py namenode

After a few minutes the Namenode puppet client requests a certificate:
puppet-master[7397]: Starting Puppet master version 2.6.1
puppet-master[7397]: 53b0b7bf-723c-4a0f-b4b1-082ebec84041 has a waiting certificate request

The Master signs the CSR:

CRON[8542]: (root) CMD (/usr/local/bin/check_csr https://mathiaz-hadoop-cluster.s3.amazonaws.com)
check_csr[8543]: INFO: Signing request: 53b0b7bf-723c-4a0f-b4b1-082ebec84041

And finally the Master compiles the manifest for the Namenode:

node_classifier[8989]: DEBUG: Checking url https://mathiaz-hadoop-cluster.s3.amazonaws.com/53b0b7bf-723c-4a0f-b4b1-082ebec84041
node_classifier[8989]: INFO: Getting node configuration: 53b0b7bf-723c-4a0f-b4b1-082ebec84041
node_classifier[8989]: DEBUG: Node configuration (53b0b7bf-723c-4a0f-b4b1-082ebec84041): classes: ['hadoop::namenode']
puppet-master[7397]: Puppet::Parser::AST::Resource failed with error ArgumentError: Could not find stage hadoop-base specified by Class[Hadoop::Base] at /etc/puppet/modules/hadoop/manifests/init.pp:142 on node 53b0b7bf-723c-4a0f-b4b1-082ebec84041

Unfortunately there is a bug related to puppet stages. As a workaround the puppet agent can be restarted:

sudo /etc/init.d/puppet restart

Looking at the syslog file on the Namenode the Puppet Agent installs and configures the Hadoop Namenode:

puppet-agent[1795]: Starting Puppet client version 2.6.1
puppet-agent[1795]: (/Stage[apt]/Hadoop::Apt/Apt::Key[cloudera]/File[/etc/apt/cloudera.key]/ensure) defined content as '{md5}dc59b632a1ce2ad325c40d0ba4a4927e'
puppet-agent[1795]: (/Stage[apt]/Hadoop::Apt/Apt::Key[cloudera]/Exec[import apt key cloudera]) Triggered 'refresh' from 1 events
puppet-agent[1795]: (/Stage[apt]/Hadoop::Apt/Apt::Sources_list[canonical]/File[/etc/apt/sources.list.d/canonical.list]/ensure) created
puppet-agent[1795]: (/Stage[apt]/Hadoop::Apt/Apt::Sources_list[cloudera]/File[/etc/apt/sources.list.d/cloudera.list]/ensure) created
puppet-agent[1795]: (/Stage[apt]/Apt::Apt/Exec[apt-get_update]) Triggered 'refresh' from 3 events

The first stage of the puppet run sets up the Canonical partner archive and the Cloudera archive. The Sun JVM is pulled from the Canonical archive while Hadoop packages are downloaded from the Cloudera archive.

The following stage creates a common Hadoop configuration:

puppet-agent[1795]: (/Stage[hadoop-base]/Hadoop::Base/File[/var/cache/debconf/sun-java6.seeds]/ensure) defined content as '{md5}1e3a7ac4c2dc9e9c3a1ae9ab2c040794'
puppet-agent[1795]: (/Stage[hadoop-base]/Hadoop::Base/Package[sun-java6-bin]/ensure) ensure changed 'purged' to 'latest'
puppet-agent[1795]: (/Stage[hadoop-base]/Hadoop::Base/Package[hadoop-0.20]/ensure) ensure changed 'purged' to 'latest'
puppet-agent[1795]: (/Stage[hadoop-base]/Hadoop::Base/File[/var/lib/hadoop-0.20/dfs]/ensure) created
puppet-agent[1795]: (/Stage[hadoop-base]/Hadoop::Base/File[/etc/hadoop-0.20/conf.puppet]/ensure) created
puppet-agent[1795]: (/Stage[hadoop-base]/Hadoop::Base/File[/etc/hadoop-0.20/conf.puppet/hdfs-site.xml]/ensure) defined content as '{md5}1f9788fceffdd1b2300c06160e7c364e'
puppet-agent[1795]: (/Stage[hadoop-base]/Hadoop::Base/Exec[/usr/sbin/update-alternatives --install /etc/hadoop-0.20/conf hadoop-0.20-conf /etc/hadoop-0.20/conf.puppet 15]) Triggered 'refresh' from 1 events
puppet-agent[1795]: (/Stage[hadoop-base]/Hadoop::Base/File[/etc/default/hadoop-0.20]/content) content changed '{md5}578894d1b3f7d636187955c15b8edb09' to '{md5}ecb699397751cbaec1b9ac8b2dd0b9c3'

Finally the Hadoop Namenode is configured:

puppet-agent[1795]: (/Stage[main]/Hadoop::Namenode/Package[hadoop-0.20-namenode]/ensure) ensure changed 'purged' to 'latest'
puppet-agent[1795]: (/Stage[main]/Hadoop::Namenode/File[hadoop-core-site]/ensure) defined content as '{md5}2f2445bf3d4e26f5ceb3c32047b19419'
puppet-agent[1795]: (/Stage[main]/Hadoop::Namenode/File[/var/lib/hadoop-0.20/dfs/name]/ensure) created
puppet-agent[1795]: (/Stage[main]/Hadoop::Namenode/Exec[format-dfs]) Triggered 'refresh' from 1 events
puppet-agent[1795]: (/Stage[main]/Hadoop::Namenode/Service[hadoop-0.20-namenode]/ensure) ensure changed 'stopped' to 'running'
puppet-agent[1795]: (/Stage[main]/Hadoop::Namenode/Service[hadoop-0.20-namenode]) Failed to call refresh: Could not start Service[hadoop-0.20-namenode]: Execution of '/etc/init.d/hadoop-0.20-namenode start' returned 1:  at /etc/puppet/modules/hadoop/manifests/init.pp:177

There is another bug in the Hadoop init script this time: the Namenode cannot be started. The puppet agent can be restarted or the next puppet run will start it:

sudo /etc/init.d/puppet restart

The Namenode daemon is running and logs information to its log file in /var/log/hadoop/hadoop-hadoop-namenode-*.log:

[...]
INFO org.apache.hadoop.hdfs.server.namenode.NameNode: Web-server up at: 0.0.0.0:50070
[...]
INFO org.apache.hadoop.ipc.Server: IPC Server handler 9 on 8200: starting
INFO org.apache.hadoop.ipc.Server: IPC Server handler 8 on 8200: starting

Start the Hadoop Jobtracker

The next component to start is the Hadoop Jobtracker:

./start_instance.py jobtracker

After some time the Puppet Master compiles the Jobtracker manifest:

DEBUG: Checking url https://mathiaz-hadoop-cluster.s3.amazonaws.com/2faa4de9-c708-45ab-a515-ae041a9d0239
node_classifier[30683]: INFO: Getting node configuration: 2faa4de9-c708-45ab-a515-ae041a9d0239
node_classifier[30683]: DEBUG: Node configuration (2faa4de9-c708-45ab-a515-ae041a9d0239): classes: ['hadoop::jobtracker']
puppet-master[23542]: Compiled catalog for 2faa4de9-c708-45ab-a515-ae041a9d0239 in environment production in 2.00 seconds

On the instance the puppet agent configures the Hadoop Jobtracker:

puppet-agent[1035]: (/Stage[main]/Hadoop::Jobtracker/File[hadoop-mapred-site]/ensure) defined content as '{md5}af3b65a08df03e14305cc5fd56674867'
puppet-agent[1035]: (/Stage[main]/Hadoop::Jobtracker/File[hadoop-core-site]/ensure) defined content as '{md5}2f2445bf3d4e26f5ceb3c32047b19419'
puppet-agent[1035]: (/Stage[main]/Hadoop::Jobtracker/Package[hadoop-0.20-jobtracker]/ensure) ensure changed 'purged' to 'latest'
puppet-agent[1035]: (/Stage[main]/Hadoop::Jobtracker/Service[hadoop-0.20-jobtracker]/ensure) ensure changed 'stopped' to 'running'
puppet-agent[1035]: (/Stage[main]/Hadoop::Jobtracker/Service[hadoop-0.20-jobtracker]) Failed to call refresh: Could not start Service[hadoop-0.20-jobtracker]: Execution of '/etc/init.d/hadoop-0.20-jobtracker start' returned 1:  at /etc/puppet/modules/hadoop/manifests/init.pp:135

There is the same bug in the init script. Let’s restart the puppet agent:

sudo /etc/init.d/puppet restart

The Jobtracker connects to the Namenode and error messages are logged on a regular basis to both the Namenode and Jobtracker log files:

INFO org.apache.hadoop.ipc.Server: IPC Server handler 7 on 8200, call
addBlock(/hadoop/mapred/system/jobtracker.info, DFSClient_-268101966, null)
from 10.122.183.121:54322: error: java.io.IOException: File
/hadoop/mapred/system/jobtracker.info could only be replicated to 0 nodes,
instead of 1
java.io.IOException: File /hadoop/mapred/system/jobtracker.info could only be
replicated to 0 nodes, instead of 1

This is normal as there aren’t any Datanode daemon available for data replication.

Start Hadoop workers

It’s now time to start the Hadoop Worker to get an operational Hadoop Cluster:

./start_instance.py worker

The Hadoop Worker holds both a Data node and a Task tracker. The Puppet agent configures them to talk to the Namenode and Job tracker respectively.

After some time the Puppet Master compiles the catalog for the Hadoop Worker:

node_classifier[8368]: DEBUG: Checking url https://mathiaz-hadoop-cluster.s3.amazonaws.com/b72a8f4d-55e6-4059-ac4b-26927f1a1016
node_classifier[8368]: INFO: Getting node configuration: b72a8f4d-55e6-4059-ac4b-26927f1a1016
node_classifier[8368]: DEBUG: Node configuration (b72a8f4d-55e6-4059-ac4b-26927f1a1016): classes: ['hadoop::worker']
puppet-master[23542]: Compiled catalog for b72a8f4d-55e6-4059-ac4b-26927f1a1016 in environment production in 0.18 seconds

On the instance the puppet agent installs the Hadoop worker:

puppet-agent[1030]: (/Stage[main]/Hadoop::Worker/File[hadoop-mapred-site]/ensure) defined content as '{md5}af3b65a08df03e14305cc5fd56674867'
puppet-agent[1030]: (/Stage[main]/Hadoop::Worker/Package[hadoop-0.20-datanode]/ensure) ensure changed 'purged' to 'latest'
puppet-agent[1030]: (/Stage[main]/Hadoop::Worker/File[/var/lib/hadoop-0.20/dfs/data]/ensure) created
puppet-agent[1030]: (/Stage[main]/Hadoop::Worker/Package[hadoop-0.20-tasktracker]/ensure) ensure changed 'purged' to 'latest'
puppet-agent[1030]: (/Stage[main]/Hadoop::Worker/File[hadoop-core-site]/ensure) defined content as '{md5}2f2445bf3d4e26f5ceb3c32047b19419'
puppet-agent[1030]: (/Stage[main]/Hadoop::Worker/Service[hadoop-0.20-datanode]/ensure) ensure changed 'stopped' to 'running'
puppet-agent[1030]: (/Stage[main]/Hadoop::Worker/Service[hadoop-0.20-datanode]) Failed to call refresh: Could not start Service[hadoop-0.20-datanode]: Execution of '/etc/init.d/hadoop-0.20-datanode start' returned 1:  at /etc/puppet/modules/hadoop/manifests/init.pp:103
puppet-agent[1030]: (/Stage[main]/Hadoop::Worker/Service[hadoop-0.20-tasktracker]/ensure) ensure changed 'stopped' to 'running'
puppet-agent[1030]: (/Stage[main]/Hadoop::Worker/Service[hadoop-0.20-tasktracker]) Failed to call refresh: Could not start Service[hadoop-0.20-tasktracker]: Execution of '/etc/init.d/hadoop-0.20-tasktracker start' returned 1:  at /etc/puppet/modules/hadoop/manifests/init.pp:103

Again the same init script bug – let’s restart the puppet agent:

sudo /etc/init.d/puppet restart

Once the worker is installed the Datanode daemon connects to the Namenode:

INFO org.apache.hadoop.hdfs.StateChange: BLOCK* NameSystem.registerDatanode: node registration from 10.249.187.5:50010 storage DS-2066068566-10.249.187.5-50010-1285276011214
INFO org.apache.hadoop.net.NetworkTopology: Adding a new node: /default-rack/10.249.187.5:50010

Similarly the Task Tracker daemon registers itself with the Jobtracker:
INFO org.apache.hadoop.net.NetworkTopology: Adding a new node: /default-rack/domU-12-31-39-03-B8-F7.compute-1.internal

The Hadoop Cluster is up and running.

Conclusion

Once the initial setup of the Puppet master is done and the Hadoop Namenode and Jobtracker are up and running adding new Hadoop Workers is
just one command:

./start_instance.py worker

Puppet automatically configures them to join the Hadoop Cluster.

Using puppet in UEC/EC2: Improving performance with Phusion Passenger

April 8, 2010

Now that we have an efficient process to start instances within UEC/EC2 and get them configured for their task by puppet we’ll dive into improving the performance of the puppetmaster with Phusion Passenger.

Why?

The default configuration used by puppetmasterd is based on webrick which doesn’t really scale well. One popular choice to improve puppetmasterd performance is to use mod passenger from the libapache2-mod-passenger package.

Apache2 setup

The configuration is based on the Puppet passenger documentation. It is available from the bzr branch as we’ll use puppet to actually configure the instance running puppetmasterd.

The puppet module has been updated to make sure the apache2 and libapache2-mod-passenger packages are installed. It also creates the relevant files and directories required to run puppetmasterd as a rack application.

Passenger and SSL modules are enabled in the apache2 configuration. All of their configuration is done inside a virtual host definition. Note that the SSL options related to certificates and private keys files points directly to /var/lib/puppet/ssl/.

Apache2 is also configured to only listen on the default puppetmaster port by replacing apache2 default ports.conf and disabling the default virtual site.

Finally the configuration of puppetmasterd has been updated so that it can correctly process the certificate clients while being run under passenger.

Note that puppetmasterd needs to be run once in order to be able to generate its ssl configuration. This happens automatically when the puppetmaster package is installed since puppetmasterd is started during the package installation.

Deploying an improved puppetmaster

Log on the puppetmaster instance and update the puppet configuration using the bzr branch:

bzr pull –remember lp:~mathiaz/+junk/uec-ec2-puppet-config-passenger /etc/puppet/

Update the configuration:

sudo puppet –node_terminus=plain /etc/puppet/manifests/puppetmaster.pp

On the Cloud Conductor start a new instance with start_instance.py. If you’re starting from scratch remember to update the start_instance.yaml
file with the puppetmaster CA and internal IP:

./start_instance.py -c start_instance.yaml AMI_NUMBER

Following /var/log/syslog on the puppetmaster you should see the new instance requesting a certificate:

Apr 8 00:40:08 ip-10-195-93-129 puppetmasterd[3353]: Starting Puppet server version 0.25.4
Apr 8 00:40:08 ip-10-195-93-129 puppetmasterd[3353]: 7d6b61a7-3772-4c41-a23d-471b417d9c47 has a waiting certificate request

Now that the puppetmasterd process is run by apache2 and mod-passenger you can check in /var/log/apache2/other_vhosts_access.logs.log the http requests made by the puppet client to get its certificate signed:

ip-10-195-93-129.ec2.internal:8140 10.195.94.224 – – [08/Apr/2010:00:40:06 +0000] “GET /production/certificate/7d6b61a7-3772-4c41-a23d-471b417d9c47 HTTP/1.1” 404 2178 “-” “-”
ip-10-195-93-129.ec2.internal:8140 10.195.94.224 – – [08/Apr/2010:00:40:08 +0000] “GET /production/certificate_request/7d6b61a7-3772-4c41-a23d-471b417d9c47 HTTP/1.1” 404 2178 “-” “-”
ip-10-195-93-129.ec2.internal:8140 10.195.94.224 – – [08/Apr/2010:00:40:08 +0000] “PUT /production/certificate_request/7d6b61a7-3772-4c41-a23d-471b417d9c47 HTTP/1.1” 200 2082 “-” “-”
ip-10-195-93-129.ec2.internal:8140 10.195.94.224 – – [08/Apr/2010:00:40:08 +0000] “GET /production/certificate/7d6b61a7-3772-4c41-a23d-471b417d9c47 HTTP/1.1” 404 2178 “-” “-”
ip-10-195-93-129.ec2.internal:8140 10.195.94.224 – – [08/Apr/2010:00:40:08 +0000] “GET /production/certificate/7d6b61a7-3772-4c41-a23d-471b417d9c47 HTTP/1.1” 404 2178 “-” “-“

Once check_csr is run by cron the certificate will be signed and the puppet client is able to retrieve its certificate:

ip-10-195-93-129.ec2.internal:8140 10.195.94.224 – – [08/Apr/2010:00:42:08 +0000] “GET /production/certificate/7d6b61a7-3772-4c41-a23d-471b417d9c47 HTTP/1.1” 200 2962 “-” “-”
ip-10-195-93-129.ec2.internal:8140 10.195.94.224 – – [08/Apr/2010:00:42:08 +0000] “GET /production/certificate_revocation_list/ca HTTP/1.1” 200 2450 “-” “-“

The puppet client ends up requesting its manifest:

ip-10-195-93-129.ec2.internal:8140 10.195.94.224 – – [08/Apr/2010:00:42:09 +0000] “GET /production/catalog/7d6b61a7-3772-4c41-a23d-471b417d9c47?facts_format=b64_zlib_yaml&facts=eNp [….] HTTP/1.1” 200 2354 “-” “-“

Conclusion

I’ve just outlined how to configure mod passeenger to run puppetmasterd which is a much more efficient setup than using the default webrick server. Most of the configuration is detailed in the files available in the bzr branch.


Using puppet in UEC/EC2: Node classification

April 7, 2010

In a previous article I discussed how to set up an automated registration process for puppet instances. We’ll now have a look at how we can tell these instances what they should be doing.

Going back to the overall architecture the Cloud conductor is the component responsible for starting new instances. Of all the three components it’s him that has the most knowledge about what an instance should be: it is the one responsible for starting a new instance after all.

Using S3 to store node definitions

We’ll use the puppet external node feature to connect the Cloud conductor with the puppetmaster. The external node script –node_classifier.py – will be responsible for telling which classes each instance is supposed to have. Whenever a puppet client connects to the master the node_classifier.py script is called with the certificate name. It is responsible for providing a description of the classes, environments and parameters for the client on its standard output in a yaml format.

Given that the Cloud conductor creates a file with the certificate name for each instance it spawns we’ll extend the start_instance.py script to store the node classification in the content of the file created in the S3 bucket.

You may have noticed that instances started by start_instance.py don’t have an ssh public key associated with them. So we’re going to create a login-allowed class that will install the authorized key for the ubuntu user.

Setup the puppetmaster to use the node classifier

We’ll use the Ubuntu Lucid Beta2 image as the base image on which to build our Puppet infrastructure.

Start an instance of the Lucid Beta2 AMI using an ssh key. Once it’s running write down its public and private DNS addresses. The public DNS address will be used to setup the puppetmaster via ssh. The private DNS address will be used as the puppetmaster hostname given out to puppet clients.

Log on the started instance via ssh to install and setup the puppet master:

  1. Update apt files:

    sudo apt-get update

  2. Install the puppet and bzr packages:

    sudo apt-get install puppet bzr

  3. Change the ownership of the puppet directory so that the ubuntu user can directly edit the puppet configuration files:

    sudo chown -R ubuntu:ubuntu /etc/puppet/

  4. On the puppetmaster check out the tutorial3 bzr branch:

    bzr branch –use-existing-dir lp:~mathiaz/+junk/uec-ec2-puppet-config-tut3 /etc/puppet/

    You’ll get a conflict for the puppet.conf file. You can ignore the conflict as the puppet.conf file from the branch is the one that supports an external node classifier:

    bzr resolve /etc/puppet/puppet.conf

Edit the node classifier script scripts/node_classifier.py to set the correct location of your S3 bucket.

Note that the script is set to return 1 if the certificate name doesn’t have a corresponding file in the S3 bucket. You may want to change the return code to 0 if you want to use the normal nodes definition. See the puppet external node documentation for more information.

The puppetmaster configuration in puppet.conf has been updated to use the external node script.

There is also the login-allowed class defined in the manifests/site.pp file. It sets the authorized key file for the ubuntu user.

On the puppetmaster edit manifests/site.pp to update the public key with your EC2 public key. You can get the public key from ~ubuntu/.ssh/authorized_key on the puppetmaster.

To bootstrap the new puppetmaster configuration run the puppet client:

sudo puppet –node_terminus=plain /etc/puppet/manifests/puppetmaster.pp

Note that you’ll have to set the node_terminus to plain to avoid calling the node classifier script when configuring the puppetmaster itself. Otherwise the puppet run would fail since the puppetmaster certificate name (which defaults the to fqdn of the instance) doesn’t have a corresponding file in the S3 bucket.

We have now our puppetmaster configured to look up the node classification for each puppet client.

Update start_instance.py to provide a node definition

It’s time to update the Cloud conductor to provide the relevant node classification information whenever it starts a new instance.

Update the bzr branch on the Cloud conductor system:

bzr pull –remember lp:~mathiaz/uec-puppet-config-tut3

The start_instance.py script has been updated to write the node classification information when it creates the instance file in the S3 bucket. That information is actually set in the start_instance.yaml file under the node key. All of the node classification information expected by the puppetmaster from the external node classifier script is set under the node key in start_instance.yaml. See the puppet external node documentation for more information on the information that can be provided by the external node script.

Review the start_instance.yaml file to make sure the S3 bucket name, the puppetmaster server IP and CA certificate are still valid for your own setup.

Start an instance:

./start_instance.py -c start_instance.yaml AMI_NUMBER

Following /var/log/syslog you should see something similar to this:

Apr 7 19:15:37 domU-12-31-39-07-D6-52 puppetmasterd[1644]: 77ad2a3c-5d52-4ca7-9fea-b99b767b09d0 has a waiting certificate request

The instance has booted and registered with the puppetmaster.

Apr 7 19:16:01 domU-12-31-39-07-D6-52 CRON[2188]: (root) CMD (/usr/local/bin/check_csr –log-level=debug https://mathiaz-puppet-nodes-1.s3.amazonaws.com)
Apr 7 19:16:02 domU-12-31-39-07-D6-52 check_csr[2189]: DEBUG: List of waiting csr: 77ad2a3c-5d52-4ca7-9fea-b99b767b09d0
Apr 7 19:16:02 domU-12-31-39-07-D6-52 check_csr[2189]: DEBUG: Checking 77ad2a3c-5d52-4ca7-9fea-b99b767b09d0
Apr 7 19:16:02 domU-12-31-39-07-D6-52 check_csr[2189]: DEBUG: Checking url https://mathiaz-puppet-nodes-1.s3.amazonaws.com/77ad2a3c-5d52-4ca7-9fea-b99b767b09d0
Apr 7 19:16:03 domU-12-31-39-07-D6-52 check_csr[2189]: INFO: Signing request: 77ad2a3c-5d52-4ca7-9fea-b99b767b09d0

The puppetmaster checked if the client request is expected and signs it.

Apr 7 19:17:39 domU-12-31-39-07-D6-52 node_classifier[2240]: DEBUG: Checking url https://mathiaz-puppet-nodes-1.s3.amazonaws.com/77ad2a3c-5d52-4ca7-9fea-b99b767b09d0
Apr 7 19:17:39 domU-12-31-39-07-D6-52 node_classifier[2240]: INFO: Getting node configuration: 77ad2a3c-5d52-4ca7-9fea-b99b767b09d0
Apr 7 19:17:39 domU-12-31-39-07-D6-52 node_classifier[2240]: DEBUG: Node configuration (77ad2a3c-5d52-4ca7-9fea-b99b767b09d0): classes: [login-allowed]
Apr 7 19:17:39 domU-12-31-39-07-D6-52 puppetmasterd[1644]: Compiled catalog for 77ad2a3c-5d52-4ca7-9fea-b99b767b09d0 in 0.01 seconds

The puppetmaster compiled a manifest for the client according to the information provided by the node classifier script.

Make sure that the instance that has been started doesn’t have any ssh key associated with it:

euca-describe-instances

Make a note of the instance ID and its public DNS name.

Login into the instance:

  1. Run euca-get-console-output instance_ID to get the ssh fingerprint. You may need to scroll back to get the fingerprints.

  2. Login into the instances using your EC2 public key:

    ssh -i ~/.ssh/ec2_key ubuntu@public_dns

Conclusion

The start_instance.py script is currently very simple and should be considered as a proof of concept.

Storing the node classification information into an S3 bucket makes it also easy to edit the content of the file. It also provides an easy way to get a list of the nodes that have been started by the Cloud Conductor as well as their classification.

If you look at the start_instance.py script you’ll notice that the ACL on the S3 bucket is ‘public-read’. That means anyone can read the list of your nodes as well as the list of classes and other node classification information for each of them. You may wanna use S3 private url instead.

We now have a puppet infrastructure where instances are started by a Cloud conductor in order to achieve a specific task. These instances automatically connect to the puppetmaster to get configured automatically for the task they’ve been created for. All of the instances configuration is stored in a reliable and scalable system: S3.

With instances being created on demand our puppet infrastructure can grow quickly. The puppetmaster can easily be responsible for managing hundreds of instances. Next we’ll have a look at how improving the performance of the puppetmaster.


Using puppet in UEC/EC2: Automating the signing process

March 25, 2010

I outlined in the previous article how to setup a puppetmaster instance on UEC/EC2 and how to start instances that will automatically register with the puppetmaster. We’re going to look at automating the process of signing puppet client certificate requests.

Overview

Our puppet infrastructure on the cloud can be broken down into three components:

  • The Cloud conductor responsible for starting new instances in our cloud.
  • A Puppetmaster responsible for configuring all the instances running in our cloud.
  • Instances acting as puppet clients asking to be setup correctly.

The idea is to have the Cloud conductor start instances and notify the puppetmaster that these new instances are coming up. The puppetmaster can then automatically sign their certificate requests.

We’ll use S3 as the way to communicate between the Cloud conductor and the puppetmaster. The Cloud conductor will also assign a random certificate to each instance it starts.

The Cloud conductor will be located on a sysadmin workstation while the puppetmaster and instances will be running in the cloud. The bzr branch contains all the scripts necessary to setup such a solution.

The Cloud conductor: start_instance.py

  1. Get the tutorial2 bzr on the Cloud conductor (an admin workstation):

    bzr branch lp:~mathiaz/+junk/uec-ec2-puppet-config-tut2

    In the scripts/ directory start_instance.py plays the role of the Cloud conductor. It creates new instances and stores their certname in S3. The start_instance.yaml configuration file provides almost the same information as the user-data.yaml file we used in the previous article.

  2. Edit the start_instance.yaml file and update each setting:

    • Choose a unique S3 bucket name.
    • Use the private DNS hostname of the instance running the puppetmaster.
    • Add the puppetmaster ca certificate found on the puppetmaster.
  3. Make sure your AWS/UEC credentials are available in the environment. The start_instance.py uses these to access EC2 to start new instances and S3 to store the instance certificate names.

  4. Start a new instance of the Lucid Beta1 AMI:

    ./start_instance.py -c ./start_instance.yaml ami-ad09e6c4

    start_instance.py starts a new instance using the AMI specified on the command line. The instance user data holds a random UUID for the puppet client certificate name. start_instance.py also creates a new file in its S3 bucket named after the puppet client certificate name.

  5. On the puppetmater looking at the puppetmaster log you should see a certificate request show up after some time:

    Mar 19 19:09:33 ip-10-245-197-226 puppetmasterd[20273]: a83b0057-ab8d-426e-b2ab-175729742adb has a waiting certificate request

Automating the signing process on the puppetmaster

It’s time to setup the puppetmaster to check if there are any certificate requests waiting and signs only the ones started by the Cloud conductor. We’ll use the check_csr.py cron job that will get the list of waiting certificate requests via puppetca --list and checks whether there is a corresponding file in the S3 bucket.

  1. On the puppetmaster get the tutorial2 bzr branch:

    bzr pull –remember lp:~mathiaz/+junk/uec-ec2-config/tut2 /etc/puppet/

  2. The puppetmaster.pp manifest has been updated to setup the check_csr.py cron job to run every 2 minutes. You need to update the cron job command line in /etc/puppet/manifests/puppetmaster.pp with your own S3 bucket name.

  3. Update the puppetmaster configuration:

    sudo puppet /etc/puppet/manifests/puppetmaster.pp

  4. Watching /var/log/syslog you should see check_csr being run by cron every other minute:

    Mar 19 19:10:01 ip-10-245-197-226 CRON[21858]: (root) CMD (/usr/local/bin/check_csr –log-level=debug https://mathiaz-puppet-nodes-1.s3.amazonaws.com)

    check_csr gets the list of waiting certificate requests and checks if there is a corresponding file in its S3 bucket:

    Mar 19 19:10:03 ip-10-245-197-226 check_csr[21859]: DEBUG: List of waiting csr: a83b0057-ab8d-426e-b2ab-175729742adb
    Mar 19 19:10:03 ip-10-245-197-226 check_csr[21859]: DEBUG: Checking a83b0057-ab8d-426e-b2ab-175729742adb
    Mar 19 19:10:03 ip-10-245-197-226 check_csr[21859]: DEBUG: Checking url https://mathiaz-puppet-nodes-1.s3.amazonaws.com/a83b0057-ab8d-426e-b2ab-175729742adb

    If so it will sign the certificate request:

    Mar 19 19:10:03 ip-10-245-197-226 check_csr[21859]: INFO: Signing request: a83b0057-ab8d-426e-b2ab-175729742adb

S3 bucket ACL

For now the S3 bucket ACL is set so that anyone can get the list files available in the bucket. However only authenticated requests can create new files in the bucket. Given that the filename are just random UUID this is not a big issue.

Using SQS instead of S3

Another implementation of the same idea is to use SQS to handle the notification of the puppetmaster by the Cloud conductor about new instances. While SQS would seem to be the best tool to provide that functionality it is not available in UEC in Lucid.

Conclusion

We end up with a puppet infrastructure where legitimate instances are automatically accepted. Now that instances can easily show up and be automatically enrolled what should these be configured as? We’ll dive into this issue in the next article.


Using puppet in UEC/EC2: puppet support in Ubuntu images

March 24, 2010

One of the focus for the Lucid release cycle in the Ubuntu Server team is to improve the integration between puppet and UEC/EC2. I’ll discuss in a series of articles how to setup a puppet infrastructure to manage Ubuntu Lucid instances running on UEC/EC2. I’ll focus on the bootstrapping process rather than writing puppet recipes.

Today we’ll look at configuring a puppetmaster into an instance and how to start instances that will register automatically with the puppetmaster.

We’ll work with the Lucid Beta1 image on EC2. All the instances started through out this article will be based on this AMI.

Puppetmaster setup

Let’s start by creating a puppetmaster running on EC2. We’ll setup all the puppet configuration via ssh using a bzr branch on Launchpad: lp:~mathiaz/+junk/uec-ec2-puppet-config-tut1.

Start an instance of the Lucid Beta1 AMI using an ssh key. Once it’s running write down its public and private DNS addresses. The public DNS address will be used to setup the puppetmaster via ssh. The private DNS address will be used as the puppetmaster hostname given out to puppet clients.

We’ll actually install the puppetmaster using puppet itself.

Log on the started instance via ssh to install and setup the puppet master:

  1. Update apt files:

    sudo apt-get update

  2. Install the puppet and bzr packages:

    sudo apt-get install puppet bzr

  3. Change the ownership of the puppet directory so that the ubuntu user can directly edit the puppet configuration files:

    sudo chown ubuntu:ubuntu /etc/puppet/

  4. Get the puppet configuration branch:

    bzr branch –use-existing-directory lp:~mathiaz/+junk/uec-ec2-puppet-config-tut1 /etc/puppet/

    Before doing the actual configuration let’s have a look at the content of the /etc/puppet/ directory created from the bzr branch.

    The layout follows the recommended puppet practices. The puppet module available in the modules directory defines a puppet::master class. The class makes sure that the puppetmaster package is installed and that the puppetmaster service is running. The manifests/puppetmaster.pp file defines the default node to be configured as a puppetmaster.

  5. We’ll now run the puppet client to setup the instance as a puppetmaster:

    sudo puppet /etc/puppet/manifests/puppetmaster.pp

Starting a new instance

Now that we have puppetmaster available in our cloud we’ll have look at how a new instances of the Lucid Beta1 AMI can be started and automatically setup to register with the puppetmaster.

We’re going to use the cloud-config puppet syntax to boot an instance and have it configure itself to connect to the puppetmaster using its user data information:

  1. On the puppetmaster instance create a user-data.yaml file to include the relevant puppetmaster configuration:

    cp /usr/share/doc/cloud-init/examples/cloud-config-puppet.txt user-data.yaml

  2. Update the server setting to point to the puppetmaster private dns hostname. I also strongly recommend to include the puppmaster ca certificate as the ca_cert setting.

    The example certname setting uses a string extrapolation to make each puppet client certificate unique: for now %i is replace by the instance Id while %f is replaced by the FQDN of the instance.

    The sample file has extensive comments about the format of the file. One of the key point is that you can set any of the puppet configuration options via the user data passed to the instance.

    Note that you can remove all the comments to make the user-data.yaml file easier to copy and paste. However don’t remove the first line (#cloud-config) as this is used by the instance boot process to start the puppet installation.

  3. Launch a new instance using the content of the user-data.yaml file you’ve just created as the user-data option passed to the new instance.

  4. You can watch the puppetmaster log on the puppetmaster instance to see when the new instance will request a new certificate:

    tail -f /var/log/syslog

  5. After some time you should see a request coming in:

    puppetmasterd[2637]: i-fdb31b96.ip-10-195-18-227.ec2.internal has a waiting certificate request

    During the boot process of the new instance the puppet cloud-config plugin used the user-data information to automatically install the puppet package, generate the /etc/puppet/puppet.conf file and start the puppetd daemon.

  6. You can then approve the new instance:

    sudo puppetca -s i-fdb31b96.ip-10-195-18-227.ec2.internal

  7. Watching the puppetmaster log you’ll see that after some time the new instance will connect and get its new manifest compiled and sent:

    puppetmasterd[2637]: Compiled catalog for i-fdb31b96.ip-10-195-18-227.ec2.internal in 0.03 seconds

In conclusion we now have an instance acting as a puppetmaster and have a single user-data configuration for the whole puppet infrastructure. That user data can be passed to new instances which will automatically register with our puppetmaster.

Even though we’re able to make all our instances automatically register with our puppetmaster we still need to manually sign each request as outlined in step 6 above. We’ll have a look at automating this step in the next article.